Enterprise Recon 2.7.0
Local Storage and Local Memory
This section covers the following topics:
- How a Local Scan Works
- Supported Operating Systems
- Licensing
- Local Storage
- Local Process Memory
- Unsupported Locations
How a Local Scan Works
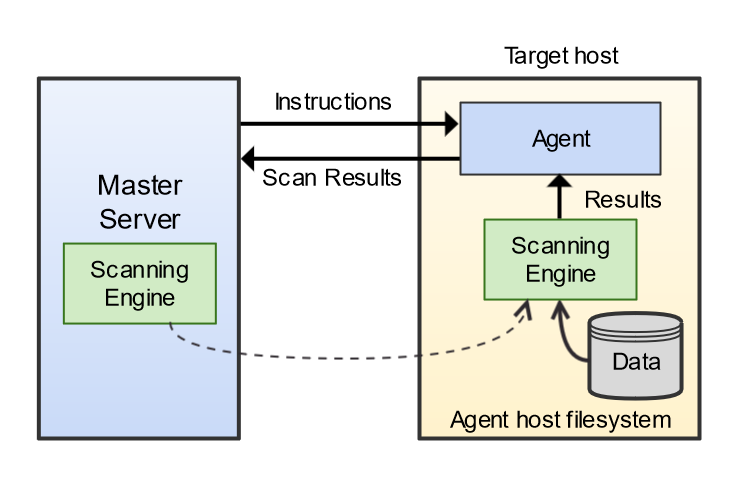
Local scans can be performed on Targets when the Node Agent is installed locally on the Target host.
When a local scan starts, the Node Agent receives instructions from the Master Server to perform a scan on the Target host. The Node Agent loads the scanning engine locally, which is executed to scan the local system. The scanning engine sends aggregated scan results back to the Node Agent, which in turn relays the results back to the Master Server.
If the Node Agent loses its connection to the Master Server, the local scan can still proceed. Results will be saved locally and sent back to the Master Server once the connection is reestablished.

Supported Operating Systems
Local storage and local memory are included by default as available scan locations when adding a new server or workstation Target.
ER2 supports the following operating systems as local storage and local memory scan locations:
| Environment (Target Category) | Operating System |
|---|---|
| Microsoft Windows Desktop (Desktop / Workstation) |
|
| Microsoft Windows Server (Server) |
|
| Linux (Server) |
|
| UNIX (Server) |
|
| macOS 1 (Desktop / Workstation) |
Scans for macOS Catalina 10.15 and above
|
1 Does not support scanning of Local Process Memory.
Microsoft Windows Operating Systems
Ground Labs supports and tests ER2 for all Windows versions supported by Microsoft.
Prior versions of Windows may continue to work as expected. However, Ground Labs cannot guarantee support for these versions indefinitely.
Linux Operating Systems
Ground Labs supports and tests ER2 for all Linux distributions currently supported by the respective providers.
Prior versions of Linux distributions may continue to work as expected. However, Ground Labs cannot guarantee support for these versions indefinitely.
macOS Operating Systems
Ground Labs supports and tests ER2 for all macOS versions supported by Apple Inc.
Prior versions of macOS may continue to work as expected. However, Ground Labs cannot guarantee support for these versions indefinitely.
Licensing
For Sitewide Licenses, all scanned local storage and local memory Targets consume data from the Sitewide License data allowance limit.
For Non-Sitewide Licenses, local storage and local memory Targets require Server & DB Licenses or Client Licenses, and consume data from the Server & DB License or Client License data allowance limit, depending on the Target operating system.
See Target Licenses for more information.
Local Storage
Local Storage refers to disks that are locally mounted on the Target server or workstation. The Target server or workstation must have a Node Agent installed.
You cannot scan a mounted network share as Local Storage.
To scan Local Storage:
- From the New Search page, Add Targets.
- In the Enter New Target Hostname field, enter the host name of the server or workstation.
- Click Test. If the host name is resolved, the Test button changes to a Commit button.
- Click Commit.
-
In Select Types, select Local Storage. You can scan the following types of Local Storage:
Local Storage Description Local Files To scan all local files:
- Select All local files.
- Click Done.
To scan a specific file or folder:
- Click Customise next to All local files.
- Enter the file or folder Path and click + Add Customised.
Windows: C:\path\to\folder\file.txt; Unix and Unix-like file systems: /home/username/file.txt.Local Shadow Volumes Windows only
To scan all local shadow volumes:
- Select All local shadow volumes.
- Click Done.
To scan a specific shadow volume:
- Click Customise next to All local shadow volumes.
- Enter the Shadow volume root and click + Add Customised.
Local Free Disk Space Windows only
Deleted files may persist on a system's local storage, and can be recovered by data recovery software. ER2 can scan local free disk space for persistent files that contain sensitive data, and flag them for remediation.
To scan the free disk space on all drives:
- Select All local free disk space.
- Click Done.
To scan the free disk space of a specific drive:
- Click Customise next to All local free disk space.
- Enter the drive letter to scan and click + Add Customised.
Scanning All local free disk space is only available for Windows environments.Recommended Least Privilege User ApproachData discovery or scanning of data requires read access. Remediation actions that act directly on supported file systems including Delete Permanently, Quarantine, Encryption and Masking require write access in order to change, delete and overwrite data.
To reduce the risk of data loss or privileged account abuse, the Agent user provided for the intended Target should only be granted read-only access to the exact resources and data that require scanning. Never grant full user access privileges or unrestricted data access to any application if it is not required.
Exclude the Read-only System Volume from Scans for macOS Targets
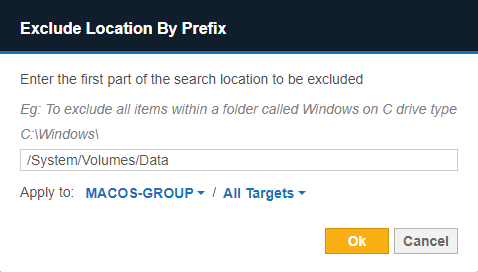
Starting from macOS Catalina 10.15, Apple has introduced a dedicated, read-only System (/System) volume that is separate from the writable Data volume that stores the top-level Users (/Users) folder, Home (/home) folder, and more. This writable Data volume is mounted on the read-only System volume and is accessible through the path /System/Volumes/Data, which may cause the same data to be scanned twice for macOS Targets if both the System and Data volumes are included in a scan.
To avoid consuming data allowance that is twice the size of the data, you are recommended to:
- Select specific folders or files when scheduling scans for macOS Targets, or
- Use the Exclude Location by Prefix Global Filter to exclude the
/System/Volumes/Data path when scanning
"All local files" for selected macOS Targets.

Local Process Memory
During normal operation, your systems, processes store and accumulate data in memory. Scanning Local Process Memory allows you to check it for sensitive data.
To scan local process memory:
- From the New Search page, Add Targets.
- In the Enter New Target Hostname field, enter the host name of the server or workstation.
- Click Test. If the host name is resolved, the Test button changes to a Commit button.
- Click Commit.
- In Select Types, select Local Memory > All local process memory.
- Click Done.
To scan a specific process or process ID (PID):
- From the New Search page, Add Targets.
- In the Enter New Target Hostname field, enter the host name of the server or workstation.
- Click Test. If the host name is resolved, the Test button changes to a Commit button.
- Click Commit.
- In Select Types, select Local Memory. Next to All local process memory, click Customise.
- Enter the process ID or process name in the Process ID or Name field.
- Click + Add Customised.
Unsupported Locations
ER2 does not follow or scan symbolic links or junctions. Each symbolic link or junction point that is skipped during a scan will have a log entry in the Scan Trace Log (if enabled).