Enterprise Recon 2.3.1
Network Storage Locations
ER2 supports the following network storage locations:
Network Storage Scans
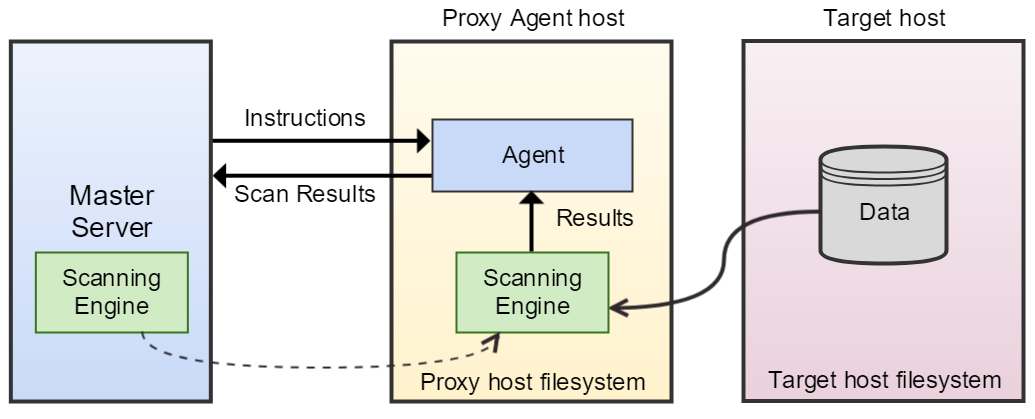
Network storage scans can be performed on mounted network share Targets via a Proxy Agent when the Node Agent is installed on a host other than the Target host.
When the Proxy Agent receives instructions from the Master Server to scan a network storage location, the Proxy Agent copies the latest version of the scanning engine to the Proxy host. The Proxy Agent then establishes a secure connection to the Target host and copies data from the Target host to the Proxy host.
The scanning engine is then executed locally on the Proxy host. It scans the data copied from the network storage Target host and sends aggregated results to the Proxy Agent, which in turn relays the results to the Master Server. Data from the Target host is not stored or transmitted to the Master Server. Only a small amount of contextual data for found matches is sent back to the Master Server for reporting purposes.
Once the scan completes, the Proxy Agent deletes the data from the Proxy host and closes the connection.

Licensing
For Sitewide Licenses, all scanned network storage Targets consume data from the Sitewide License data allowance limit.
For Non-Sitewide Licenses, network storage Targets require Server & DB Licenses or Client Licenses, and consume data from the Server & DB License or Client License data allowance limit, depending on the Target operating system.
See Target Licenses for more information.
Windows Share
Requirements
To scan a Windows share Target:
- Use a Windows Proxy Agent.
- Ensure that the Target is accessible from the Proxy Agent host.
-
The Target credential set must have the minimum required permissions to access the Target locations to be scanned.
Recommended Least Privilege User ApproachData discovery or scanning of data requires read access. Remediation actions that act directly on supported file systems including Delete Permanently, Quarantine, Encryption and Masking require write access in order to change, delete and overwrite data.
To reduce the risk of data loss or privileged account abuse, the Target credentials provided for the intended Target should only be granted read-only access to the exact resources and data that require scanning. Never grant full user access privileges or unrestricted data access to any application if it is not required.
Add Target
- From the New Scan page, Add Targets.
- In the Select Target Type window, enter the host name of the Windows share server in the Enter New Target Hostname field.
For example, if your Windows share path is \\remote-share-server-name\remote-share-name, enter the Target Hostname as remote-share-server-name:

- Click Test. If ER2 can connect to the Target, the button changes to a Commit button.
- In the Select Types dialog box, click on Network Storage.
- Under Network Storage Location Type, select Windows Share.
-
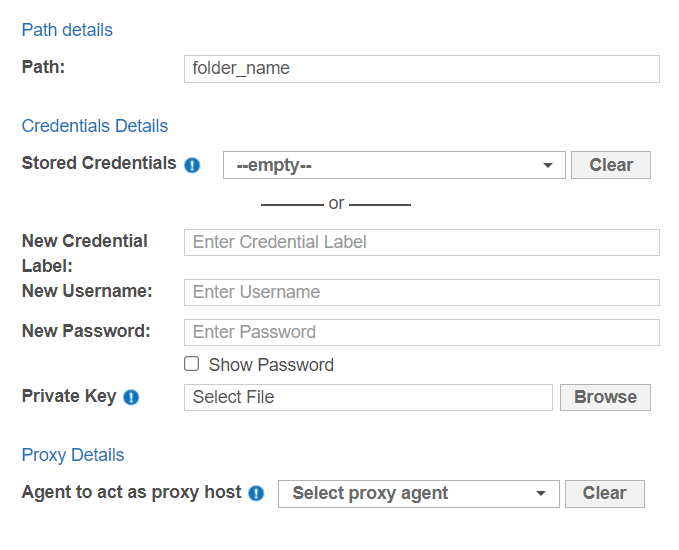
Fill in the following fields:

Field Description Path Enter the path of the folder to scan.
For example: <folder_name>Credential Label Enter a descriptive label for the credential set. Username Enter your user name.
See Windows Target Credentials for further information.Password Enter your password, or passphrase for the private key. (Optional) Private Key Upload the file containing the private key.
Only required for Target hosts that use a public key-based authentication method. See Set Up SSH Public Key Authentication for more information.Agent to act as proxy host Select a Windows Proxy Agent that matches the Target operating system (32-bit or 64-bit). - Click Test, and then + Add Customized to finish adding the Target location.
Windows Target Credentials
For scanning of Windows local storage using a Windows proxy agent, use the appropriate user name format when setting up the target Windows hosts credentials:
| Username | Description |
|---|---|
| <domain\username> | Windows target host resides in the same Active Directory domain as the Windows proxy agent. |
| <target_hostname\username> | Windows target host does not reside in the same Active Directory domain as the Windows proxy agent. |
Unix File Share (NFS)
Requirements
Select the Unix File Share Target type when scanning a Network File System (NFS) share.
To scan a Unix file share Target:
- Use a Unix or Unix-like Proxy Agent.
- The Target credential set must have the minimum required permissions to access the Target locations to be scanned.
- The Target must be mounted on the Proxy Agent host.
-
The Path field must be set to the mount path on the Proxy host when adding a Unix file share Target.
Recommended Least Privilege User ApproachData discovery or scanning of data requires read access. Remediation actions that act directly on supported file systems including Delete Permanently, Quarantine, Encryption and Masking require write access in order to change, delete and overwrite data.
To reduce the risk of data loss or privileged account abuse, the Target credentials provided for the intended Target should only be granted read-only access to the exact resources and data that require scanning. Never grant full user access privileges or unrestricted data access to any application if it is not required.
To mount an NFS share server, on the Proxy host, run as root:
# Requires nfs-common. Install with `apt-get install nfs-common`
mount <nfs-server-hostname|nfs-server-ipaddress>:</target/directory/share-name>
Add Target
- From the New Scan page, Add Targets.
- In the Select Target Type window, enter the host name of the Unix file share server in the Enter New Target Hostname field. This is usually an NFS file server.
For example, if your Unix file share path is //remote-share-server-name/remote-share-name, enter the Target Hostname as remote-share-server-name:

- Click Test. If ER2 can connect to the Target, the button changes to a Commit button.
- In the Select Types dialog box, click on Network Storage.
- Under Network Storage Location Type, select UNIX File Share.
-
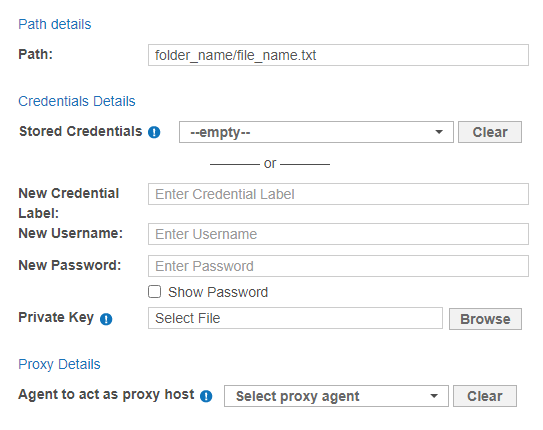
Fill in the following fields:

Field Description Path Enter the file path to scan. This is the mount path on the Proxy host for the Unix file share Target.
For example: <folder_name/file_name.txt>Agent to act as proxy host Select a Linux Proxy Agent. File share must be mounted on the selected Linux Proxy Agent host. - Click + Add Customised to finish adding the Target location.
Remote Access via SSH
Requirements
To scan a Target using remote access via SSH:
- The Target host must have an SSH server running on TCP port 22.
- The Proxy Agent host must have an SSH client installed.
Supported Operating Systems
ER2 supports the following operating systems as remote access via SSH Targets:
| Environment (Target Category) | Operating System |
|---|---|
| Microsoft Windows Desktop (Desktop / Workstation) |
|
| Microsoft Windows Server (Server) |
|
| Linux (Server) |
|
| UNIX (Server) |
|
| macOS (Desktop / Workstation) |
|
Microsoft Windows Operating Systems
Ground Labs supports and tests ER2 for all Windows versions supported by Microsoft.
Prior versions of Windows may continue to work as expected. However, Ground Labs cannot guarantee support for these versions indefinitely.
Linux Operating Systems
Ground Labs supports and tests ER2 for all Linux distributions listed under Supported Operating Systems. However, other Linux distributions that are not indicated may work as expected.
Add Target
- From the New Scan page, Add Targets.
- In the Select Target Type window, enter the host name of the remote share server in the Enter New Target Hostname field. The remote share server must have an SSH server running.

- Click Test. If ER2 can connect to the Target, the button changes to a Commit button.
- In the Select Types dialog box, click on Network Storage.
- Under Network Storage Location Type, select Remote access via SSH.
-
Fill in the following fields:

Field Description Path Enter the file path to scan.
For example, <folder_name/file_name.txt>.
Credential Label Enter a descriptive label for the credential set. Username Enter your remote host user name.
Password - SSH password authentication:
Enter your remote host user password. - SSH key pair authentication using private key (password-protected):
Enter the passphrase for the private key. - SSH key pair authentication using private key (non password-protected):
Leave the field blank.
Private Key Upload the file containing the private key compatible with SSH format. For example, userA_ssh_key.pem.
See Set up SSH Public Key Authentication for more information.
The user account on the remote host must be configured to enable SSH key-pair authentication.Proxy Agent Select a Proxy Agent host with direct Internet access. Recommended Least Privilege User ApproachData discovery or scanning of data requires read access. Remediation actions that act directly on supported file systems including Delete Permanently, Quarantine, Encryption and Masking require write access in order to change, delete and overwrite data.
To reduce the risk of data loss or privileged account abuse, the Target credentials provided for the intended Target should only be granted read-only access to the exact resources and data that require scanning. Never grant full user access privileges or unrestricted data access to any application if it is not required.
- SSH password authentication:
- Click Test, and then + Add Customized to finish adding the Target location.
Hadoop Clusters
Requirements
To scan a Hadoop cluster, you must have:
- A Target NameNode running Hadoop 2.7.3 or similar.
- A Proxy host running the Linux 3 Agent with database runtime components for Linux systems. See Install Linux 3 Agent for more information.
Install Linux 3 Agent
To install the Linux 3 Agent with database runtime components:
- On the designated Proxy host, go to the Web Console and navigate to Settings > Agents > Node Agent Downloads.
-
In the list of Node Agents available for download, select the Linux 3 64bit (DEB) * or Linux 3 64bit (Red Hat) (RPM) * Agent.
Make sure that the Agent installation package has "database-runtime" in its Filename. -
To install the Linux 3 64bit (DEB) * database runtime Agent:
# Install Linux 3 Agent, where 'er2_2.x.x-linux3-x64_database_runtime.deb' is the location of the deb package on your computer. dpkg -i er2_2.x.x-linux3-x64_database-runtime.deb
# Install the required packages apt-get install krb5-user libgsasl7 libcurl4 libprotobuf10 -
To install the Linux 3 64bit (Red Hat) (RPM) * database runtime Agent:
# Remove existing ER2 packages
rpm -e er2

# Install the epel-release package
yum install epel-release

# Install the required packages
yum install libxml2 libgsasl openssl libcurl libuuid protobuf krb5-libs libaio

# Install the Linux 3 Agent, where 'er2-2.x.x-linux3-rh-x64_database-runtime.rpm' is the location of the rpm package on your computer.
rpm -ivh er2-2.x.x-linux3-rh-x64_database-runtime.rpm
Add Target
- From the New Scan page, Add Targets.
- In the Select Target Type window, enter the host name of the NameNode of the Hadoop cluster in the Enter New Target Hostname field.
For example, if your HDFS share path is hdfs://remote-share-server-name/remote-share-name, the host name of the NameNode is remote-share-server-name. Enter the Target Hostname as remote-share-server-name:

- Click Test. If ER2 can connect to the Target, the button changes to a Commit button.
- In the Select Types dialog box, click on Network Storage.
- Under Network Storage Location Type, select Hadoop.
- Fill in the following fields:

Field Description Path Enter the file path to scan. For example, <folder_name>/<file_name>.
If the NameNode is accessed on a custom port (default: 8020), enter the port before the HDFS file path: (port=<port>)<folder_name>/<file_name>.
For example, to scan a Hadoop cluster with NameNode accessed on port 58020, enter (port=58020)folder-A/file-A.txt.Proxy Agent Linux 3 Agent with database runtime components. -
Click + Add Customised to finish adding the Target location.
Recommended Least Privilege User ApproachTo reduce the risk of data loss or privileged account abuse, the Target credentials provided for the intended Target should only be granted read-only access to the exact resources and data that require scanning. Never grant full user access privileges or unrestricted data access to any application if it is not required.