Enterprise Recon 2.5.0
Agent Admin
This article covers the following topics:
View Agents
Log in to the ER2 Web Console. Go to the Settings > Agents > Agent Admin page to see a list of Node Agents on your network.

Sort the list of Node Agents by column headers, or use the Filter by panel to filter Node Agents by Agent Name, Version, Connection Status or Status.
| Column | Description |
|---|---|
| Agent Name | Host name of the Node Agent or Proxy Agent host. |
| Version | Version of the Agent installed. Select the blank option to display only Agent Groups. |
| Connection Status | If the Agent is connected to the Master Server, the Agent's IP address is displayed. |
| Proxy |
When selected, allows the Agent to act as a Proxy Agent in scans where a Target has no locally installed Node Agent. For information on the difference between Node and Proxy Agents, see About Enterprise Recon 2.5.0. |
| Status | |
| ✓ Verify All |
In this column, you can apply the following actions to an agent:
|
Verify Agents
Verifying a Node or Proxy Agent establishes it as a trusted Agent. Only verified Agents may scan Targets and send reports to the Master Server.
After an Agent is verified, ER2 encrypts all further communication between the Agent and the Master Server.
How To Verify an Agent
- On the Agent Admin page, click Verify on the Agent. To verify all Agents, click Verify All.
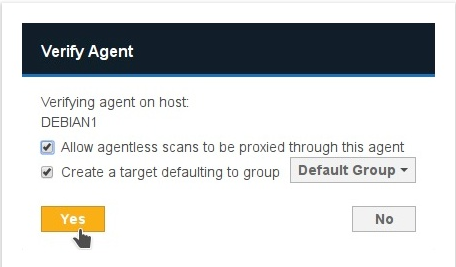
- In the Verify Agent window, select:
- Allow agentless scans to be proxied through this agent: Allows this Agent to act as a Proxy Agent.
-
Create a target defaulting to group <Target Group Name>: Assigns the Agent host as a Target which defaults to the selected Target Group Name from the list.
 Creating a Target does not consume a license. A license is consumed only when a scan is attempted.
- Click Yes to verify the Agent.
Delete Agents
You can delete an Agent if it is no longer in use.
Deleting an Agent does not remove the Target host of the same name.
- Disconnect Node Agent "Host 1".
- Delete Node Agent "Host 1".
- Target host "Host 1" remains available in the Targets page.
To delete an Agent:
- Disconnect the agent from the Master Server by doing one of the following:
- Stop the er2-agent service on the Agent host.
- Uninstall the Node Agent from the host.
-
Manually disconnect the Agent host from the network.
See respective Node Agent pages in Install Node Agents on how to stop or uninstall Node Agents.
- On the Agent Admin page, go to the last column in the Agent list and click Delete.
Block Agents
You can block an Agent from connecting to the Master Server.
When an Agent is blocked, its IP address is added to the Access Control List which blocks only the Agent from communicating with the Master Server.
Upgrade Node Agents
See Agent Upgrade for more information.