DATA RECON 2.0.25
Results and Remediation
Beginning a scan on the DATA RECON GUI will take you to the DATA RECON Results screen.
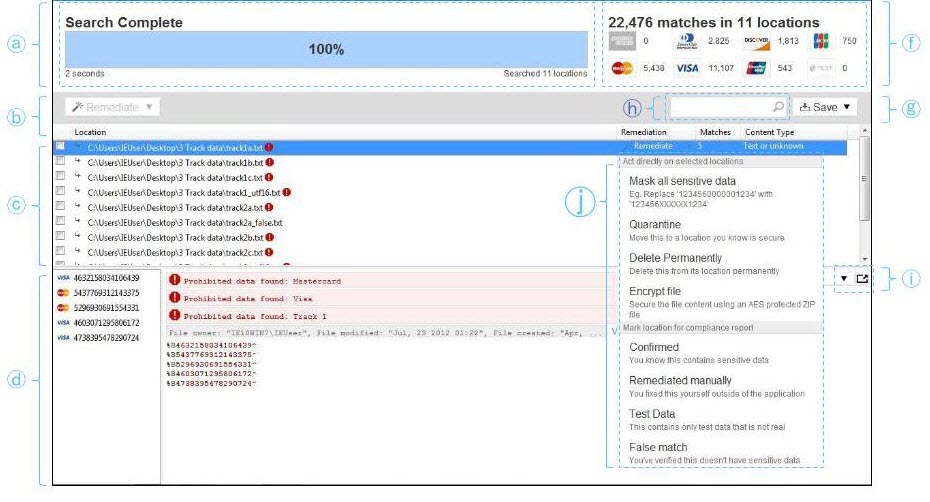
The Results screen displays a summary of the current scan, which will help you decide how to manage non-compliant data found during the scan.

| Label | Description | |
|---|---|---|
| a | The scan progress bar | Shows the progress of the currently running scan, and controls to stop, pause, or skip files during the current scan. |
| b | Bulk remediate/mark | Selecting one or more matches in the match list will allow you to remediate or mark matches in bulk. See Remediating and Marking Matches. |
| c | Match list | Shows list of matched data; selecting an item on this list will bring up its details on the Match Inspector. |
| d | Match Inspector | Shows specific match details. |
| f | Match summary | Shows a summary of match data found during the scan. |
| g | Save results database/match list/compliance report | Save options drop-down menu. |
| h | Filter matches | Type in search terms to quickly filter match results. |
| i | Detach Match Inspector/Change Match Inspector view | Clicking on the “detach” icon will detach the Match Inspector from the DATA RECON window; the Match Inspector can display match details as text or as a hex file. |
| j | Remediate/Mark matches | For more information on how to remediate/mark matches, see Remediating and Marking Matches. |
If you click Back to go to the dashboard, and start a new scan by clicking Search, you current scan progress will be lost.
Once DATA RECON completes a scan, it will ask if you want to save a compliance report.
If you have already configured DATA RECON to save a compliance report, DATA RECON will not prompt you about report saving.