Enterprise Recon 2.13.0
Investigate
This section covers the following:
- Overview
- Navigate to the Investigate Page
- Filter Targets and Locations
- Results Grid Column Chooser
- Sort Match Locations
- View Match Inspector
- Trash Locations
- Export Match Reports
- View Inaccessible Locations
Overview
The Investigate page provides a one-stop view of match locations across all Targets to help users easily review, export and remediate match results.
Within the Investigate page, users can:
- Filter the results set according to specific criteria,
- Export CSV match reports of the Investigate page based on the applied filters (if any),
- Show, hide or rearrange the columns in the results grid with the Column Chooser,
- Sort match locations within a Target,
- View the Match Inspector to review the list of matches and evaluate the remediation options,
- Remove scan results for Targets or selected match locations, and
- View the list of inaccessible locations for each Target.
Navigate to the Investigate Page
There are several ways to access the Investigate page.
- Navigation Menu
- Log in to the ER2 Web Console.
- Go to Investigate. The Investigate page displays the complete list of match locations across all Targets on the Master Server.
- Targets Page
- Log in to the ER2 Web Console.
- Go to Targets.
-
To go to the Investigate page, click on the:
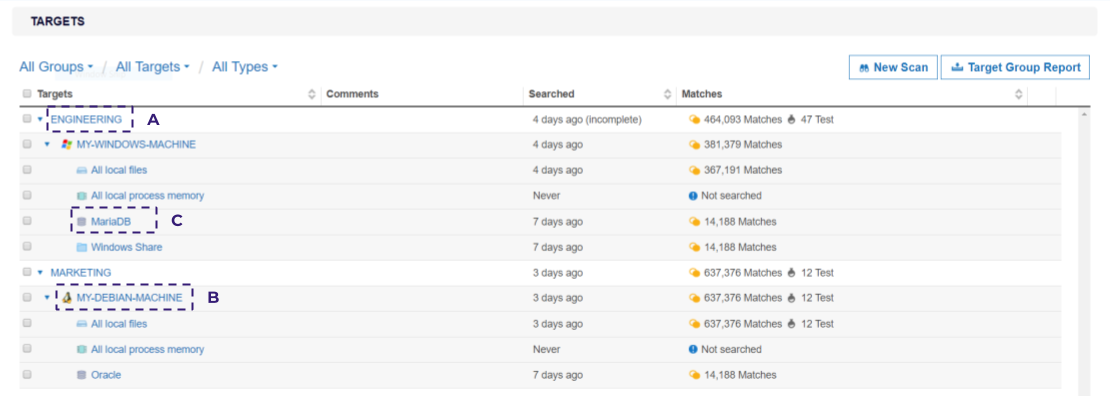
Item Description (A) Target Group Investigate page displays match locations for all Targets in the associated Target Group. (B) Target Investigate page displays match locations for the selected Target. (C) Target Location Investigate page displays match locations for the selected Target location.
To view the Investigate page components, see Investigate Page User Interface - Investigate Page Components.
Filter Targets and Locations
You can filter the results displayed in the results grid according to specific criteria.
To filter Targets and locations:
- In the Investigate page, click the Filter
 button to display the Filter Locations By panel. The Filter button will
change to Hide
button to display the Filter Locations By panel. The Filter button will
change to Hide  button that you can click to hide the panel again.
 - In the Filter Locations By panel that appears, select one or more filters to show specific Targets and match locations in the results grid. A green dot indicates which filter criteria contains selected filter items. For the complete table of filter criteria, see Investigate Page User Interface - Filter Criteria.
- Click APPLY FILTER to update the results grid to display only the match
locations that fulfill all the selected filter criteria. Filters that are
applied to the match results set will be displayed in the filter tags pane
above the results grid.

- Click See More or See Less to expand or collapse the filter tags view, or click Clear All to reset all filters.
Results Grid Column Chooser
You can customize the Results Grid view by showing, hiding or rearranging the columns with the Column Chooser.

To show, hide or rearrange the columns:
- In the Investigate page, click the
Columns
 button.
 - In the Edit Columns dialog box:
- Show a column to the results grid by dragging the <Column> tile from the Available Columns panel, to the Selected Columns panel.
- Hide a column from the results grid by dragging the <Column> tile from the Selected Columns panel, to the Available Columns panel.
- Rearrange the column sequence in the results grid by dragging a <Column> tile up or down in the Selected Columns panel.
- Click Ok to save the column configuration.
- (Optional) To adjust the column width, hover over the column boundary until
the resizing cursor
 appears,
then hold and drag the column boundary to resize the width.
appears,
then hold and drag the column boundary to resize the width.
The column and column width settings are saved only for the logged in user account, and will be displayed for subsequent logins to the Web Console until further changes are made.
Sort Match Locations
To sort match locations within a Target, click the ˄ and ˅ arrow at each column header in the result grid:
| Column Headers | Toggle Function |
|---|---|
|
|
|
|
|
|
[1] This feature is only available when Data Access Management is enabled.
View Match Inspector
The Match Inspector window allows you to review the list of matches for a specific match location and evaluate the remediation options.
For the list of components found in the Match Inspector window, see Investigate Page User Interface - Match Inspector Components.
To view the Match Inspector window:
- Go to the Investigate page.
- Click on the arrow to the left of the Target name to expand and show all match locations within a Target.
- (Optional) Sort the list of match locations by:
- Location - Full path of the match location,
- Owner - User with Owner permissions,
- Status - Remediation, access control or classification status(es) for the match location,
-
Matches - Match count and match severity (e.g. prohibited, match, test) ,
- Access PRO [2] - Number of unique users with any form of access permissions to the location, or
- Access Control PRO [2] - Access control actions taken on a given location.
- Risk PRO - Highest priority risk level mapped to a given location.
- MIP Label PRO - MIP sensitivity label applied to a given location.
- Classification Status PRO - Classification status of the MIP sensitivity label (e.g. Discovered, Classified, Policy-based) applied to a given location.
-
Click on the match location to bring up the Match Inspector. The Match Inspector window opens as a right-side panel with the window header showing the path of the selected match location.
You can hover over and drag the icon to resize the Match Inspector window. - In the Match Inspector window, review the information in the Details,
[match count], Risk Profiles, and Access tabs.
-
To view the list of match samples, click the icon next to the data type category. The maximum number of match samples that can be displayed is 1000.
You can check the current match censorship level being applied to your scans. If you need to modify the current configuration, set the new censorship level before initiating a scan to prevent the need for rescanning. For more information, refer to Set Censorship Level.To view the match count breakdown for each data type, click See breakdown. The data types are sorted by match count in descending order.
- To expand the list of the data type match count breakdown in the match preview, click View all data types . The data types are sorted by match count in descending order.
- To select the encoding format to use for displaying the match sample and surrounding contextual data, click the icon and select the encoding format.
See Investigate Page User Interface - Match Inspector Tabs for more information on the details displayed in each tab.
Match preview may not be available for some of the detected matches; these are listed under the Not shown in preview section (grouped by data type category).In the [match count] tab, you can hide the match breakdown panel to make more space for the match preview by clicking the icon. Click the
  icon to view the match breakdown panel again.Contextual data
Contextual data is the data surrounding the matches found in a match location. Reviewing contextual data may be helpful in determining if the match itself is genuine, since matches are always masked dynamically when presented on the Web Console.
To display contextual data around matches, make sure this option is selected when you schedule a scan.
Scanning EBCDIC-based systems can be enabled in Data Type Profiles.
-
- Evaluate the remediation options. See Remediation for more information.
[2] This feature is only available when Data Access Management is enabled.
Trash Locations
You can use the Trash Locations function to remove scan results for Targets or selected match locations by applying the location filters.
Using the Trash Locations button to remove scan results does not delete the actual match data on the Target. If no remedial action was taken, the scan results that were trashed would be detected as match locations if a scan is executed again on the Target.
To delete scan results:
- (Optional) In the Investigate page, select one or more filters in the Filter Locations by panel and click Apply Filter to display specific Targets and match locations in the results grid.
- In the results grid, select the Targets or match locations.
- Click the Trash Locations button
 to remove scan results for the
selected Targets or match locations.
to remove scan results for the
selected Targets or match locations. - Enter a name in the Confirm Removal of Data Type field.
- Click Confirm.
Export Match Reports
You can generate a CSV report of the match results and locations that are selected in the results grid of the Investigate page. See Match Report for more information.
View Inaccessible Locations
When ER2 encounters any error when accessing files, folders and drives on a Target during a scan, they are logged as Inaccessible Locations with the following information:
| Column Header | Description |
|---|---|
| Location | Full path or location of the inaccessible location. |
| Severity | Severity level (Critical  , Error , Error  , Notice , Notice  , Intervention , Intervention  ) for the inaccessible location. ) for the inaccessible location. |
| Description | Error message or details about the inaccessible location. |
| Logged | Timestamp when the inaccessible location was logged. |
The log of inaccessible locations should be reviewed to ensure there are no issues in the scan setup, such as scanning a Target using credentials with insufficient permissions.
To view the log of inaccessible locations for a Target:
- Log in to the ER2 Web Console.
- Go to the Investigate page.
- Hover over the Target and click on the gear
 icon.
icon. - Select Inaccessible Locations from the drop-down menu.
You can also view the list of inaccessible locations from the Targets page.
PRO This feature is only available in Enterprise Recon PRO Edition. To find out more about upgrading your ER2 license, please contact Ground Labs Licensing. See Subscription License for more information.