Enterprise Recon 2.13.0
Windows Agent
This section covers the following topics:
- Overview
- Supported Operating Systems
- Install the Node Agent
- Configure the Node Agent
- Restart the Node Agent
- Uninstall the Node Agent
- Upgrade the Node Agent
Overview
There are two versions of the Windows Node Agent:
| Node Agent | Description |
|---|---|
| Microsoft Windows (32-/64-bit) Node Agent | For normal operation. Scans Targets that are not databases. |
| Microsoft Windows (32-/64-bit) Node Agent with database runtime components | Includes database runtime components that allow scanning of Microsoft SQL Server, DB2, and Oracle databases without installing additional drivers or configuring DSNs. |
Install the Windows Node Agent with database runtime components if you intend to run scans on Microsoft SQL Server, IBM DB2, or Oracle databases.
Supported Operating Systems
| Environment (Target Category) | Operating System |
|---|---|
| Microsoft Windows Desktop |
|
| Microsoft Windows Server |
|
Microsoft Windows Operating Systems
Ground Labs supports and tests ER2 for all Windows versions supported by Microsoft.
Prior versions of Windows may continue to work as expected. However, Ground Labs cannot guarantee support for these versions indefinitely.
Install the Node Agent
- Log in to the ER2 Web Console.
- Go to Settings > Agents > Node Agent Downloads.
- On the Node Agent Downloads page, download the appropriate Windows Node Agent installer.
- (Optional) Verify the checksum of the downloaded Node Agent package file.
- If there is a previous version of the Node Agent installed, remove it first.
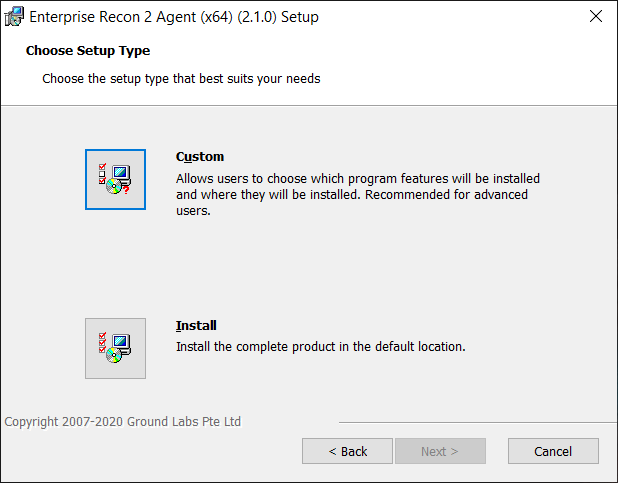
- Run the downloaded installer and click Next >.
- To install the Node Agent, select Install.

-
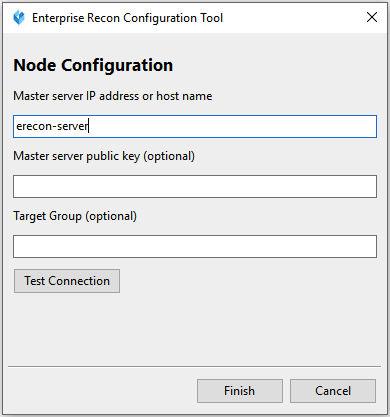
While the Node Agent is being installed, the installer prompts you to configure your Node Agent to connect to the Master Server.
 Get the Master Server public key from the Server Information page.
 - Fill in the fields and click Test Connection.
- Click Finish to complete the installation.
Verify Checksum for Node Agent Package File
You can determine the integrity of the downloaded Node Agent package file by verifying the checksum before installing the Node Agent.
- Download the Node Agent package file.
- Run the commands in a terminal to generate the hash value for the Node Agent package file.
-
MD5 hash (128-bit)
# Syntax: certutil -hashfile <path to Node Agent package file> MD5
certutil -hashfile er2_2.x.x-windows-x64.msi MD5
Example MD5 hash: f65a2cd26570ddb7efb6a2a4318388ac -
SHA1 hash (160-bit)
# Syntax: certutil -hashfile <path to Node Agent package file> SHA1
certutil -hashfile er2_2.x.x-windows-x64.msi SHA1
Example SHA1 hash: 33bcd6678580ae38a03183e94b4038e72b8f18f4 -
SHA256 hash (256-bit)
# Syntax: certutil -hashfile <path to Node Agent package file> SHA256
certutil -hashfile er2_2.x.x-windows-x64.msi SHA256
Example SHA256 hash: 1ee094a222f7d9bae9015ab2c4ea37df71000556b3acd2632ee27013844c49da
-
- In the ER2 Web Console, go to the Settings > Agents > Node Agent Downloads page. The Hash column lists the expected hash values for each Node Agent package file.
-
Compare the generated hash values from Step 2 with the expected hash values listed in the Web Console; both hash values should be equal.
If the hash values do not match, check that your network connection is stable, download the Node Agent package again from the Web Console, and verify the checksums again. If the issue still persists, contact Ground Labs Technical Support.
Configure the Node Agent
To configure the Node Agent (to point to a new Master Server, or update the Master Public Key):
-
On the Node Agent host, run the following file as an Administrator:
C:\Program Files (x86)\Ground Labs\Enterprise Recon 2\er_config_gui.exe -
Configure the following fields and click Test Connection.
Setting Description Master server IP Address or host name Specify a Master Server's host name or IP address. For example, 10.1.100.100. Master server public key (optional) Enter the Master Public Key. Get the Master Server public key from the Server Information page.Target Group (optional) Specify Target initial group. -
Click Finish to complete the installation.
Restart the Node Agent
To restart the Node Agent, run the commands in Command Prompt as Administrator:
net stop "Enterprise Recon 2 Agent" # stops the Agent
net start "Enterprise Recon 2 Agent" # starts the Agent
Uninstall the Node Agent
Windows 64-bit Node Agent
To uninstall the Node Agent:
- In the Control Panel, go to Programs > Programs and Features.
- Search for Enterprise Recon 2 Agent (x64) in the list of installed programs.
- Right click on Enterprise Recon 2 Agent (x64), select Uninstall, and follow the wizard.
To uninstall the Node Agent from the command line, open the Command Prompt as Administrator and run:
wmic product where name="Enterprise Recon 2 Agent" uninstall
Windows 32-bit Node Agent
To uninstall the Node Agent:
- In the Control Panel, go to Programs > Programs and Features.
- Search for Enterprise Recon 2 Agent (x32) in the list of installed programs.
- Right click on Enterprise Recon 2 Agent (x32), select Uninstall, and follow the wizard.
To uninstall the Node Agent from the command line, open the Command Prompt as Administrator and run:
wmic product where name="Enterprise Recon 2 Agent" uninstall
Upgrade the Node Agent
See Agent Upgrade for more information.