Enterprise Recon 2.0.31
Office 365 Mail
To set up Office 365 mail as a Target:
To scan a specific user account in Office 365, see Edit Office 365 Target Path.
Instructions for configuring a cloud service account's security settings are provided here for the user's convenience only. For the most up-to-date instructions, please consult the cloud service provider's official documentation.
General Requirements
- Proxy Agent host with direct Internet access.
- Cloud service-specific access keys.
Enable Impersonation in Office 365
To scan Office 365, use a service account assigned with the ApplicationImpersonation and Mailbox Search roles:
- Log into your Office 365 global administrator account.
- Create a new service account for use with ER2.
Service Accounts
Service accounts are user accounts set up to perform administrative tasks only. Because of the broad permissions granted to service accounts, we recommend that you closely monitor and limit access to these accounts.
Office 365 Licenses
Office 365 does not usually require you to assign an Office 365 license to the service account used to scan mailboxes. - We need a custom admin role to assign the service account to. To create a custom admin role:
- Navigate to the Exchange admin center by going to ADMIN > Exchange.
- In the Exchange admin center, select permissions and go to the admin roles tab.
- In the roles tab, click +.
- This brings up the Role Group page. Configure the custom admin role:
- Under the Roles section, select the ApplicationImpersonation and Mailbox Search roles.
- Add the service account created in step 2 to the list of Members, or users that are assigned this custom admin role.
- Click Save.
Set up Office 365 Mail as a Target location
- Enable Impersonation in Office 365.
- From the New Search page, Add Targets.
- In the Select Target Type dialog box, select Office 365 Mail.
-
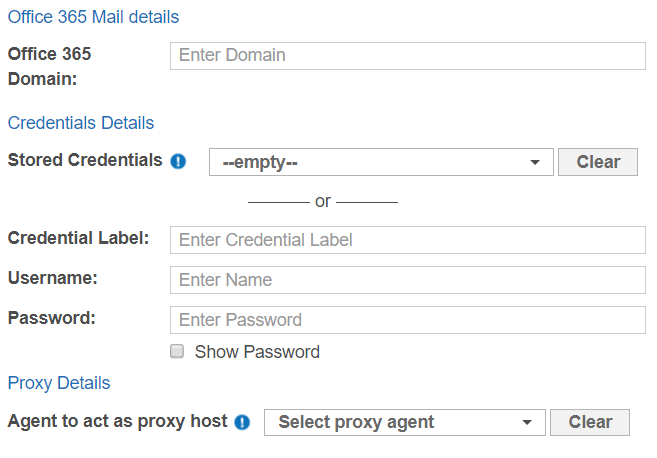
Fill in the following details:

Field Description Office 365 Domain Enter your Office 365 domain name.
To scan a specific Office 365 user account, see Edit Office 365 Target Path.Credential Label Enter a descriptive label for the credential set. Username Enter the service account user name. See Enable Impersonation in Office 365 for more information. Password Enter your service account password. Agent to act as proxy host Select a Proxy Agent host with direct Internet access. - Click Test. If ER2 can connect to the Target, the button changes to a Commit button.
- Click Commit to add the Target.
Edit Office 365 Target Path
- Set up Office 365 Mail as a Target location.
- In the Select Locations section, select your Office 365 Target location and click Edit.
-
In the Edit Office 365 Mail Location dialog box, enter a Path to scan. Use the following syntax:
Path Syntax Specific user account <User Display Name> - Click Test and then Commit to save the path to the Target location.