Enterprise Recon 2.0.31
OneDrive
This section covers the following topics:
- OneDrive for Business
- Licensing
- Preparing to Add Target Location
- Set OneDrive for Business as a Target Location
- Add a Path for OneDrive for Business
General Requirements
- Proxy Agent host with direct Internet access.
- Cloud service-specific access keys.
OneDrive for Business
To scan OneDrive for Business, you must add your Office 365 organization as a Target. Each user's OneDrive for Business account is represented internally by Microsoft as a "My Site" Site Collection. For ER2 to scan the OneDrive for Business user account, we have to be granted permissions to scan these Site Collections.
On the Web Console, browsing an added OneDrive for Business Target lists all Office 365 user accounts. Select only user accounts that have OneDrive for Business enabled to add them as scan locations. Scanning a user account that does not have OneDrive for Business enabled will result in ER2 reporting it as an inaccessible location.
Licensing
OneDrive for Business accounts are licensed as Office 365 Targets. See Licensing for more information.
Preparing to Add Target Location
Before adding OneDrive for Business as a Target, you have to perform the following on your Office 365 organization:
- Add OneDrive for Business user accounts to a group
- Add secondary Site Collection Administrator to all OneDrive for Business user accounts
Once done, see Set OneDrive for Business as a Target Location.
Add OneDrive for Business user accounts to a group
- Create a new Office 365 group. This group will be used to hold all Office 365 users with OneDrive for Business enabled. Name it "ER2OneDrive" or similar. See Microsoft: Create an Office 365 group in the admin center for more information.
- Connect to SharePoint Online using the SharePoint Online Management Shell. Using the Management Shell, get a list of all Office 365 users with OneDrive for Business enabled. See Microsoft: How to display a list of OneDrive for Business site collections for more information.
- Add the list of Office 365 users with OneDrive for Business enabled to the "ER2OneDrive" group.
Add secondary Site Collection Administrator to all OneDrive for Business user accounts
-
Create a service account to scan OneDrive for Business, or use an existing service account. This service account should be assigned Global Administrator permissions.
A service account is a user account created only for use with a specific service or application to interact with a system. -
Add the service account as a secondary administrator for the "My Site" Site Collection on all target OneDrive for Business accounts.
Please refer to Microsoft documentation for the most updated instructions.- Connect to the SharePoint Online Admin Center.
- Navigate to user profiles > Manage User Profiles.
- Search for a specific user profile and click on Manage site collection owners.
- In the site collection owners window, add the service account as the secondary site collection administrator.
- Repeat this for all OneDrive for Business accounts.
Set OneDrive for Business as a Target Location
- From the New Search page, Add Targets.
- In the Select Target Type dialog box, select OneDrive.
-
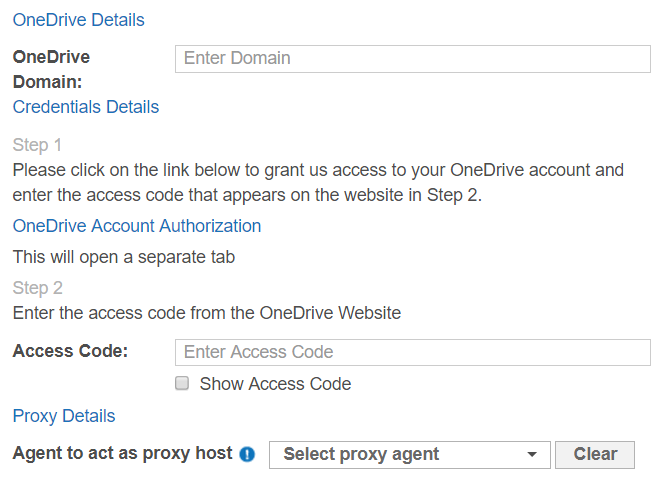
In the OneDrive Details section, fill in the following fields:

Field Description OneDrive Domain Enter the email address of your service account.
This service account must be a Global Administrator that has been assigned as a Site Collection Administrator for all Target OneDrive for Business accounts.
OneDrive Account Authorization Obtain the OneDrive access code: - In OneDrive Details, click on OneDrive Account Authorization. This opens the OneDrive account authorization page in a new browser window.
- Log into your Microsoft account.
- Click Yes.
- Copy the Access Code.

Access Code Enter the Access Code obtained during OneDrive Account Authorization. Agent to act as proxy host Select a Proxy Agent host with direct Internet access. - Click Test. If ER2 can connect to the Target, the button changes to a Commit button.
- Click Commit to add the Target.
- Click on the arrow next to the newly added OneDrive for Business Target to display a list of groups.
-
Select the "ER2OneDrive" group.
Selecting a user account that does not have OneDrive for Business enabled will result in ER2 reporting it as an inaccessible location. - Click Next to continue configuring your scan.
Add a Path for OneDrive for Business
- Set OneDrive for Business as a Target Location.
- In the Select Locations section, select your OneDrive Target location and click Edit.
-
In the Edit OneDrive Location dialog box, enter the Path to scan. Use the following syntax:
Path Syntax All users in a group <group_name> All files from specific user <group_name/user_name> Specific folder from specific user <group_name/user_name/folder_name> Specific file from specific user <group_name/user_name[/<folder_name>]/file_name.txt> -
Click on OneDrive Account Authorization and follow the on-screen instructions. Enter the Access Code obtained into the Access Code field.
Each additional location requires you to generate a new Access Code for use with ER2. - Click Test and then Commit to save the path to the Target location.