Enterprise Recon 2.6.0
Investigate
This section covers the following:
Overview
The Investigate page provides a one-stop view of match locations across all Targets to help users easily review, export and remediate match results.

Users can get to the Investigate page from the navigation menu or Targets page. See Navigation for more information.
Within the Investigate page, users can sort the list of match locations across all Targets, or filter the results set according to specific criteria. These filters can also be used when exporting CSV match reports from the Investigate page. See Export for more information.
Users can navigate from the Investigate or Targets page to view the list of inaccessible locations for each Target. See Inaccessible Locations for more information.
Navigation
There are several ways to access the Investigate page.
- Navigation Menu
- Log in to the ER2 Web Console.
- Go to Investigate. The Investigate page displays the complete list of match locations across all Targets on the Master Server.
- Targets Page
- Log in to the ER2 Web Console.
- Go to Targets.
-
To go to the Investigate page, click on the:
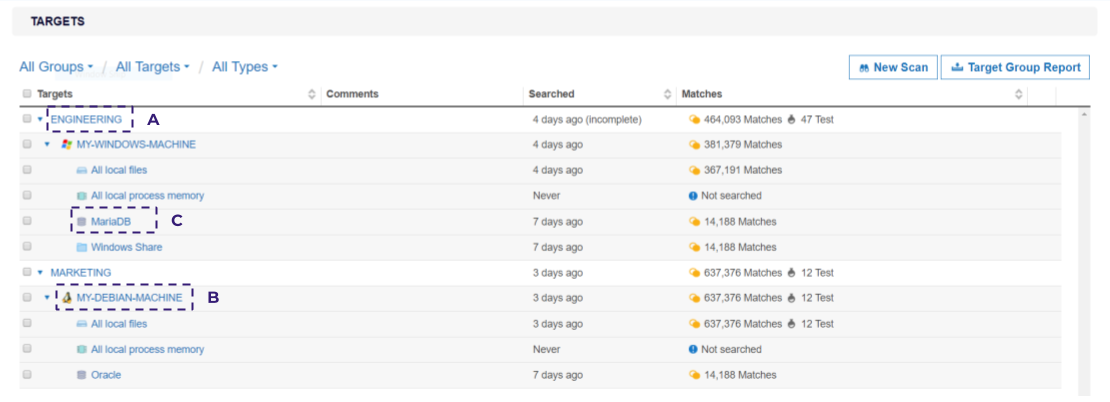
Item Description (A) Target Group Investigate page displays match locations for all Targets in the associated Target Group. (B) Target Investigate page displays match locations for the selected Target. (C) Target Location Investigate page displays match locations for the selected Target location.
Components
The following table is a list of components found in the Investigate page:

| Component | Description |
|---|---|
| Results Grid |
Displays the match results across all Targets. Target Group tags indicate the Target Group that the Target belongs to, and filter tags describe the filters that are applied to the match results set in the results grid. Clicking on the arrow to the left of the Target name expands to show all match locations within a Target. Match results should then be reviewed and remediated where necessary. |
| Sort Target Locations | Display match results within a Target by the selected sort order (e.g. Location, Owner, Status, Sign-Off, Matches). See Sort Target Locations for more information. |
| Filter Locations By | Display specific Targets or match locations according to the filter criteria. See Filter Targets and Locations for more information. |
| Columns | Add, remove, and prioritze columns to display in the Results Grid. See Results Grid Column Chooser for more information. |
| Match Inspector | Displays detailed information for a match location. See Match Inspector for more information. |
| Remediate | Perform remedial actions on selected Targets and match locations.
See Remediation for more information.
This feature is only available to users with Remediate or Global Admin permissions.
|
| Control Access PRO | Perform access control actions on selected Targets and match locations.
See Data Access Management for more information.
This feature is only available to users with Access
Control or Global Admin permissions when Data Access Management is
enabled.
|
| Classify PRO | Manually classify or remove the MIP sensitivity labels for selected Targets and match locations.
See Data Classification with MIP for more information.
This feature is only available to users with Classification or Global Admin permissions.
|
| Trash | Remove scan results for specific locations or data types from a Target. See Trash for more information. |
| Export | Export a CSV report of the Targets and match locations that are selected in the results grid. See Export for more information. |
Target Options  |
Dropdown menu to Edit Target, access Target Reports, Inaccessible Locations, Operation Log, Scan History and Scan Trace Logs. |
Filter Targets and Locations
Select one or more filters in the Filter Locations By panel to show specific Targets and match locations in the results grid. Clicking on Apply Filter updates the results grid to display only the match locations that fulfill all the selected filter criteria.
| Filters | Description |
|---|---|
| Path Keywords | Only show match locations that contain a given keyword in the path or file name. Partial string matching is supported. |
| Risk Profiles PRO | Only show match locations that are mapped to specific risk profiles, or classified
as specific risk levels.
See Risk Scoring and Labeling for more information. |
| Targets | Only show results for the selected Target Groups or Targets. |
| Target Types | Only show results for the selected Target types. |
| File Formats | Only show results for the selected file formats or content types. |
| Metadata | Only show match locations that contain specific metadata information. Available metadata filters include:
|
| Access PRO | Only show match locations that are accessible by specific groups, users, or user classes.
Use the following format to filter by domain groups or user: <domain>\<group or username>.
See Data Access Management for more information. The Access filter will only apply to locations scanned or rescanned with ER 2.2 and above.
This feature is only available when Data Access
Management is enabled.
|
| Classification PRO |
Only show match locations with the selected
See Data Classification with MIP for more information. The Classification filter will only apply to locations scanned or rescanned with ER 2.2 and above.
|
| Data Types | Only show match locations that contain the selected data types. |
| Operation Status | Only show match locations with the selected remediation, access control or classification status. |
| Advanced Filters | Only show match locations that fulfil the conditions defined in the selected Advanced Filters. |
Filters that are applied to the match results set will be displayed in the filter tags pane above the results grid.
- Click See More or See Less to expand or collapse the filter tags view.
- Click Clear All to reset all filters.

Results Grid Column Chooser
You can customize the Results Grid view by adding, removing or rearranging the columns with the Column Chooser.

- In the Investigate page, click the
Columns
 button.
 - In the Edit Columns dialog box:
- Add a column to the Results Grid by dragging the <Column> tile from the Available Columns panel, to the Selected Columns panel.
- Remove a column from the Results Grid by dragging the <Column> tile from the Selected Columns panel, to the Available Columns panel.
- Rearrange the column sequence in the Results Grid by dragging a <Column> tile up or down in the Selected Columns panel.
- Click Ok to save the column configuration.
- (Optional) To adjust the column width, hover over the column boundary until
the resizing cursor
 appears,
then hold and drag the column boundary to resize the width.
appears,
then hold and drag the column boundary to resize the width.
The column and column width settings are saved only for the logged in user account, and will be displayed for subsequent logins to the Web Console until further changes are made.
Sort Target Locations
Match locations within a Target can be sorted in the results grid using the ˄ and ˅ arrow at each column header.
| Column Headers | Toggle Function |
|---|---|
|
|
|
|
|
|
[1] This feature is only available when Data Access Management is enabled.
Match Inspector
The Match Inspector window allows you to review the list of matches for a specific match location and evaluate the remediation options.
- Go to the Investigate page.
- Click on the arrow to the left of the Target name to expand and show all match locations within a Target.
- (Optional) Sort the list of match locations by:
- Location - Full path of the match location,
- Owner - User with Owner permissions,
- Status - Remediation, access control or classification status(es) for the match location,
-
Matches - Match count and match severity (e.g. prohibited, match, test),
- Access PRO [2] - Number of unique users with any form of access permissions to the location, or
- Access Control PRO [2] - Access control actions taken on a given location.
- Risk PRO - Highest priority risk level mapped to a given location.
- MIP Label PRO - MIP sensitivity label applied to a given location.
- Classification Status PRO - Classification status of the MIP sensitivity label (e.g. Discovered, Classified, Policy-based) applied to a given location.
-
Click on the match location to bring up the Match Inspector.

Component Description Data type matches Displays the list of matches detected in the match location, sorted by data type. Match details Displays samples and contextual data for the match. Click on View all info to see the metadata and a breakdown of data type matches for the match location. Match sample encoding Select the encoding format to use for displaying contextual data for the match.
Encoding options: Plain text (ASCII), EBCDIC (used in IBM mainframes), Hexadecimal.Contextual dataContextual data is the data surrounding the matches found in a match location. Reviewing contextual data may be helpful in determining if the match itself is genuine, since matches are always masked dynamically when presented on the Web Console.
To display contextual data around matches, make sure this option is selected when you schedule a scan.
Scanning EBCDIC-based systems can be enabled in Data Type Profiles.
[2] This feature is only available when Data Access Management is enabled.
See Remediation for more information.
Trash
You can use the Trash function to remove scan results for Targets or selected match locations by applying the location filters.
Using the Trash button to remove scan results does not delete the actual match data on the Target. If no remedial action was taken, the scan results that were trashed would be detected as match locations if a scan is executed again on the Target.
To delete scan results:
- (Optional) In the Investigate page, select one or more filters in the Filter Locations by panel and click Apply Filter to display specific Targets and match locations in the results grid.
- In the results grid, select the Targets or match locations.
- Click the Trash button
 to remove scan results for the selected Targets or
match locations.
to remove scan results for the selected Targets or
match locations. - Enter a name in the Confirm Removal of Data Type field.
- Click Confirm.
Export
You can generate a CSV report of the match results and locations that are selected in the results grid of the Investigate page. See Match Report for more information.
Inaccessible Locations
When ER2 encounters any error when accessing files, folders and drives on a Target during a scan, they are logged as Inaccessible Locations. The log of inaccessible locations should be reviewed to ensure there are no issues in the scan setup, such as scanning a Target using credentials with insufficient permissions.
To view the log of inaccessible locations for a Target:
- Log in to the ER2 Web Console.
- Go to the Investigate page.
- Hover over the Target and click on the gear icon.
- Select Inaccessible Locations from the drop-down menu.
You can also view the list of inaccessible locations from the Targets page.
Investigate Permissions
Resource permissions that are assigned to a user grants access to specific components in the Investigate page.
| Components | Resource Permissions |
|---|---|
| Navigation | |
|
Target / Target Group: Report - Detailed Reporting, Remediate, Access Control PRO, or Classification PRO |
|
Target / Target Group: Report - Detailed Reporting, Remediate, Access Control PRO, or Classification PRO |
|
Target / Target Group: Report - Detailed Reporting, Remediate, Access Control PRO, or Classification PRO |
| Results Grid | |
|
Target / Target Group: Report - Detailed Reporting, Remediate, Access Control PRO, or Classification PRO |
|
Target / Target Group: Report - Detailed Reporting, Remediate, Access Control PRO, or Classification PRO |
| Remediate | |
|
Target / Target Group: Remediate |
|
Target / Target Group: Remediate - Mark Location for Report |
|
Target / Target Group: Remediate - Act Directly on Location |
|
N/A [3] |
| Control Access | |
|
Target / Target Group: Access Control PRO |
| Classification | |
|
Target / Target Group: Classification PRO |
| Export | |
|
Target / Target Group: Report - Detailed Reporting, Remediate, Access Control PRO, or Classification PRO |
| Filter Locations By |
|
Target / Target Group: Report - Detailed Reporting, Remediate, Access Control PRO, or Classification PRO |
|
Target / Target Group: Report - Detailed Reporting, Remediate, Access Control PRO, or Classification PRO |
[3] This feature is only available to users with Global Admin permissions.
For more information about resource permissions in ER2, see Resource Permissions.